Sunday, December 9, 2012

Homey dinner on a snowy day - Tator Tot hotdish


Tator Tot Hotdish is a family favorite.

Grandma used to make it all the time.  Now my dad does.  He modified Grandma's Recipe to be healthier (and tastier).  Now I too am making it, and modifying it!

Grandma's receipe has about 3 lbs of burger (and onions), 1 frozen bag of mixed veggies and 3 cans of "Cream of XXX soup", then 1 bag of tator tots.  And oodles of salt :)


Here's the Recipe I made and photos as I made it (My dad's is super similar):

Preheat oven to 325ºF.  Put a few tator tots on the bottom of the roaster:

To soak up some juice and give you some spuds on the bottom

Brown one pound hamburger with one diced onion. (MY ADDITION: add one 8oz pack of mushrooms, sliced).  SEASON YOUR MEAT with lots of salt and pepper.  (MY ADDITION: a few glugs of Balsami Vinegar too)
1 pound burger, 1 onion, 1 -8oz sliced mushrooms, salt, pepper, balsmic vinegar...MMMM

In a separate kettle,boil some carrots to soften them a bit. add frozen corn (1 bag) and frozen green beans(1 bag).  MY ADDITION:  Add some smoked paprika to the veggies.

veggies, as they begin to thaw, that's why they are segmented

Veggies all stirred up so you can see the ratios
Then stir in one can of cream of mushroom soup into the veggies.  Make sure you keep all the liquid in the veggies, this keeps your Hotdish moist.  AND IS SUPER GOOD on Day #2

Then Layer into the roaster!

Veggies with Cream of Mushroom Soup  on top of base layer of tots

 NEXT, Add ground Beef mixture to the top
mmmm.  tasty.  Like I said Mushrooms are my addition along with Balsamic Vinegar

Cover with Tots
ALRIGHT, Using regular AND sweet potato tots were my experiment this time.  I will skip it next time, they get to soft and don't hold form.  BUT it makes for pretty hotdish and it wasn't horrible.


BAKE at 325 for like an hour.  Everything is cooked, but you gotta get everything to meld together!

I forgot a picture of the finished product, but believe me, it was good :)

Have fun making it!
Tuesday, November 13, 2012

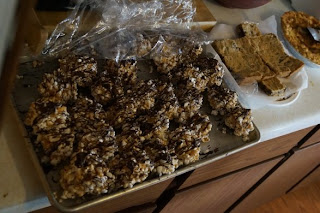
Caramel Popcorn Balls!

So for a family function in September, we decided to make Caramel Popcorn Balls!  It was Czeck family gathering at the home farm near Foley.

We wanted to make Caramel Popcorn balls.  I know that Aunt Aggie, used to make them every year at Halloween, so I called her daughter Maureen for the recipe!    So this recipe comes from the DeGross family!

Caramel Popcorn Balls with Chocolate (Photo Credit to Cousin Terry)


CARAMEL POPCORN BALLS


First we popped 2 batches of pop corn in the air-popper.  (About a total of 1 cup of un popped corn.  We did it in 2 batches (1/2c each).  DO NOT SALT THE POPCORN!

For the Caramel:

1 cup Sugar
1 cup Heavy whipping cream
1 cup Caro syrup
1 tsp salt.

Bring to boil.  Keep Stirring.  You need to bring the mixture to 242-248 degrees.  It will get foamy and start getting thick.  if you don't have a candy thermometer, you can use the "Firm Ball test"  Firm ball: Forms a firm ball that will not flatten when removed from water, but remains malleable and will flatten when squeezed. 

When it's done, add  1 tsp Vanilla.  Stir in and then pour over popcorn.  Wearing rubber gloves with butter on can help form the balls.  if you caramel, wasn't quite hot enough, you might have to let it sit a bit longer before forming balls.  If you got it too hot(very firm ball), You may ned to form balls immediately!

Enjoy!

Thursday, November 8, 2012

Wedding Jam


A few people have asked me and my mom for the tasty Jam recipes that we used to make our wedding jams.  Sadly, We didn't really write down recipes for any of them, but I can tell you we followed the same pattern each time.


4 cups fruit
1 cup fruit juice
1-3 Tablespoons Lemon Juice(depending on the acidity of the fruit...You want enough acid to prevent botulism)
3 Tablespoons Pectin (this is less than the recipe on the jar calls for!)
1 1/2 cup sugar

Here is the Recipe for those who want an 'accurate' recipe for the "Favorite".


2 Cups Apricots (pitted and diced)
2 Cups Nectarines (peeled, pitted and diced)
1 Cup "Simply Naked" Orange + Mango Juice
3 Tablespoons Lemon Juice
3 Tablespoons Pectin

Put ALL of the above ingredients in a kettle.  Stir.  Bring to a boil.  Let boil for abour 2 minutes

Then add 1 1/2 cups sugar.  Keep stirring.  Bring back to a boil and let boil for another minute.

Then Jar into jars.

After jarring, put in a hot water bath and boil for 5 minutes, then remove from water and let rest on the counter.  Listen for the 'sealing' pop!  Then Enjoy!


Monday, November 5, 2012

What do you do with extra Pumpkin?? Pumpkin Banana Muffins

What do you do when you make a recipe that uses 1/2 cup of pumpkin and you have a 15oz can?

 You find another recipe!

Here it is:
http://www.alidaskitchen.com/2012/09/pumpkin-banana-muffins.html


Pumpkin Banana Muffins

Yields 30 mini-muffins (or 15-18 standard muffins)

Ingredients

2 cups whole wheat pastry flour or all-purpose flour (or 1 cup all-purpose flour/1 cup whole wheat flour)
1/2 cup brown sugar, packed
1 teaspoon baking powder
1/2 teaspoon baking soda
1 teaspoon cinnamon
1 teaspoon pumpkin pie spice
2 bananas, mashed
1 cup pumpkin puree
1/4 cup canola oil
2 eggs
1 teaspoon vanilla

All mixed up!  I recommend adding sugar with the wets, not in the dries....that was strange...

Directions:


  1. Preheat oven to 350 degrees.  Spray muffin tins with baking spray and fill empty cups with water.  Set aside.
  2. In a large bowl, whisk together the flours, sugar, baking powder, baking soda, cinnamon, and pumpkin pie spice.
  3. In a separate bowl, whisk the bananas, pumpkin, oil, eggs and vanilla, until well-blended.
  4. Add banana mixture to flour mixture, gently folding until combined.
  5. Divide mixture evenly among prepared muffin cups. 
  6. Bake for 11 to 13 minutes for mini muffins / 13 to 15 minutes for standard muffins, or until a toothpick inserted in the center comes out clean.
Finished!  This made 19 muffins.  PS I LOVE Silicon Baking cups!  Thanks Aunt Sandra!

Overall:  

These are a little bland.  They need a bit more cinnamon or pumpkin pie spice!  I ADDED Chocolate chips to the last 7 muffins, they are good :)


Sunday, November 4, 2012

Pumpkin Chocolate Chip Brownies - a pinterest recipe!

I spend very little time on Pinterest, but occasionally something catches my eye.  I have 'pinned' a lot of recipes, but I have never made any.

This is my first use of something from Pinterest.

Siting the source of my recipe, here is the link of where I found it:
http://penniesonaplatter.com/2010/11/02/pumpkin-chocolate-chip-brownies/

I made this today, when I got up at 7:30 because of daylight savings time!

I, of course, didn't follow it to a T, I never do.  I am providing my modifications!


Pumpkin Chocolate Chip Brownies

Yield: 24 small brownies

1/2 cup pumpkin puree
1 whole egg
2 egg whites
1 tbsp vegetable or canola oil
1 cup flour
1 tsp baking powder
1 tsp unsweetened cocoa powder
1/2 tsp ground cinnamon
1/2 tsp ground allspice
1/4 tsp ground nutmeg
1/4 tsp salt
2/3 cup brown sugar, packed
2/3 cup semisweet chocolate chips & Ghiradelli chunks combined (about equal parts, whatever you have in the fridge works!)
Preheat oven to 350˚F.  Spray a 11″- x 7″-inch pan(Quarter Baking Sheet) a cooking spray.
In a large bowl, combine pumpkin puree, eggs and oil until smooth.  Add Sugar and beat until smooth.  Set aside.
In a separate medium bowl, mix together the flour, baking powder, spices, and salt.  Add to the wet ingredients and mix until thoroughly incorporated.  Stir in the chocolate chips.
This is just to show you, it doesn't make much batter.
Pour into prepared pan and spread evenly.  Bake for 15 – 20 minutes or until passes toothpick test.  Cool completely before cutting.


Because there wasn't a lot of batter, it wasn't easy to spread evenly!


IN THE OVEN


DONE!

These were very tasty.  I was scared of the Allspice.  Also, I would NOT call these "Brownies".  They are a chewy chocolate chip bar that has pumpkin in it.  they aren't thick enough for me to call them a brownie...


I'd DEFINITELY MAKE AGAIN.  I'd also DOUBLE the recipe.  Maybe even triple it, in order to use  a whole 15oz pumpkin can!

WHAT DID I DO, with the other part of the pumplin?
Stay tuned.  I'll post about it on TUESDAY, but lets just say I had some bananas that needed to be used too....So I found a way to use them both!

Friday, November 2, 2012

9 week anniversary - Mushroom Risotto

Today is our 9 week anniversary!

We celebrated with Steak and Mushroom Risotto(and Strongbow!)

Here's the Recipe as close as I can get as I make Risotto from a feeling, not from a recipe!


Mushroom Risotto

Some Olive Oil (1-2 Tbsp)
1 onion diced
4 cloves of garlic
1 1/2 cups ARRBORIO Rice(this is important!)
1 cup white wine
 24 oz mushrooms (we used 16oz white button mushrooms sliced and 8oz baby bellas sliced)
4-5 cups Broth (Beef in this occasion)
1/4 parmesan cheese, shredded

- Get the pan hot(I used a Le Creuset pot)
- Add the oil
- Add the onions.  Cook until translucent
- Add the Garlic partially through
- DO NOT let Garlic and onions burn, try to get them to sweat and turn translucent
- add the rice.  You want to "Roast" the rice.  You'll see the hulls start to change color.
- Add the wine.  Cook til reduced by half
- Add the mushrooms and about half of the beef broth.  Stir
-  Keep stirring until most of the liquid is absorbed.  Then add more.
probably the first add of liquid


- Keep Stirring
-  After all liquid is added and almost all absorbed, taste the rice to see if it is 'soft' or still a dente.  If it is soft, you can be done, else find more water to add.
-  You want the Rice to be "a lungo" like the waves.  So it should be a bit saucy and form 'waves'.
-  Add the cheese at the end, stir in until melted. Then serve..

Thursday, November 1, 2012

8 week anniversary


This week (October 26th) we celebrated with RICE KRISPIE TREATS!

For added fun, we put Candy Corn in with the cereal as well :)

woohoo


Aren't you excited for the 9 week update now too???

I'll try taking pictures....

I've been told it should be "Make Ice Cream for your friends".

ANY OTHER SUGGESTIONS FOR OTHER WEEKS?

(this is kinda fun to 'celebrate' with something dorky!)

Tuesday, October 30, 2012

7 Week Anniversary


How do you celebrate your 7 week wedding anniversary?

Ours was October 19th, 2012....

We made cookies together...
(no pictures, no recipe)

BUT it had white chocolate M&Ms and ghiradelli chocolate in it...(the recipe was on the back of the chocolate!)

Saturday, October 27, 2012

Carrot Cake, a Wedding Cake


In case you didn't know, I got married on August 31, 2012!

We both LOVE Carrot Cake!  We both LOVE my parents recipe for carrot cake.  It's super moist and flavorful.  So, it was clear what we wanted for cake at our wedding.  Our wedding list was just about 190.  So we decided, that if we cut a cake into 16 pieces(a very generous portion), we would need 12 cakes.

My Aunt Mary volunteered to make 5 cakes.  I asked her to make hers nutless and 9x13.  So they'd be square pieces, and the nutted pieces would be from 9" rounds.  This I would make with my parents.  We thought we'd make 8 more.  We made 4 batches (8 rounds), 2 weeks before the wedding and froze them.  We made 5 batches (10 rounds), the week before and froze them.  (So we ended with 14 cakes!)

Do not worry about 5 weeks prior to the wedding we tested the recipe and freezing it.  We then tested SEVERAL different recipes for frosting.  We settled with a combination of my aunt' recipe and our sister-in-law's recipe.

Two Kitchen-aids to make the frosting


Then the day before the wedding, my mom, cousin Megan and I made all the frosting.  The day of the wedding several aunts and an uncle frosted the cakes!
Decorating the morning of the wedding!


It was really simple to make our own cakes...and we had GREAT RESULTS!  And 2.5 cakes left over!
Endless cake...


So, I share here the recipe!


Carrot Cake


No Oil, Refrigerate Cake after cooling.

3 eggs

1 cup gran sugar

1 teaspoon salt

1 teaspoon vanilla

2 teaspoon cinnamon

2 teaspoon baking soda

2 teaspoon baking powder

2 cup flour


1 cup raisins

1 ½ cup crushed pineapple (drain slightly)

1 cup coconut

½ cup chopped walnuts

1 ½ cup apple sauce (sugar free)

2 cup carrots chopped fine


Cream together eggs, sugar, apple sauce at low speed. In separate bowl
combine flour, cinnamon, salt, baking soda, baking powder and add to creamed
mixture. Then add vanilla.

Lastly add carrots, raisins, nuts, pineapple and coconut. Mix on low speed.

Pour cake mixture into a 9 X 13 greased and floured pan. (or 2 – 9” rounds)

Bake at 350 for 1 hour 9 X 13 or 9” rounds bake 45 minutes. Test with
toothpick. Cake done if toothpick comes out clean.

When cool frost with Cream Cheese Frosting recipe below.

Then refrigerate.

Cream Cheese Frosting


1 8 oz package cream cheese (softened)

1 4 oz stick butter (softened)

2 ½ cups powdered sugar

2 tsp vanilla

Mix together well cream cheese and butter, add vanilla and powdered sugar
and mix well so it is a little fluffy.

Frost cakes and refrigerate for best results.


Thursday, July 12, 2012

HAWAII BOUND

Saturday, I'm off to the only US state that can grow Cocoa beans!

I hope to see large waves, eat chocolate, drink Kona Coffee and AVOID SUN BURNS!

Wish me luck!  Pictures to come hopefully!

Tuesday, March 27, 2012

Tropical Chicken Tacos

Saturday, while getting my hair done, I found a new magazine, that I wanted to try about 7 recipes out of.  So, I took it home with me.

Magazine:  "Clean Eating"
April/May 2012

Page 51

Tropical Chicken Tacos

Marinade:
1 jalepeno pepper, seeded and minced
1/2 cup low fat coconut milk
1/4 cup minced red onion
3 Tablespoons minced pineapple
1 tsp ancho chile powder
1/4 tsp sea salt
1/4 tsp fresh ground black pepper
4 - 4oz chicken breastes

Salsa:
1 jalepeno pepper, seeded and minced
3 cups cubed pineapple
1 loosely packed cup fresh cilantro, chopped
1/4 cup minced red onion
1/4 cup toasted unsweetened coconut
1/8 tsp salt

For Tacos:
12 - 6" corn tortillas

Instructions:
1.  In large mixing bowl or zip lock bag combine all ingredients for marinade.  Marinate at room temperature for 30 minutes or overnight in the Refridgerator(NOTE: Chicken should not marinate for more than 8 hrs)

2.  Meanwhile, prepare the salsa, cover and refrigerate until needed( Salsa can be prepared up to 1 day in advance)

3.  Heat a grill or a grill pan(use some safflower oil if using a pan).  Cook chicken until throroughly cooked through (about 12 minutes).   Remove from heat; transfer to a cutting board let rest for 5 minutes, then slice up and divide among tortillas.

Top each with salsa!

The salsa bowl, almost gone!

a half eaten taco


I WILL make this recipe again.
I can't wait to make the other 6 recipes from this magazine that I am excited about!

Sunday, March 25, 2012

Chile Shrimp Tacos

Tonight's dinner comes courtesy of "Clean Eating" - April/May 2012 Magazine!  More about this magazine in my next post.

So, yesterday we had chicken tacos out of the same magazine.  That recipe will come later as well.  Looking for something easy and tasty, we gave this new recipe a try too.

Easy = YES
Fast = YES
Tasty = YES
Would we make it again?   YES

Chile Shrimp Tacos

Serves 4; Hands-on Time: 15 minutes
Total Time: 45 Minutes...that's for shrimp marinating time.

"Juice grapefruit and lime brighten up these fresh and light shrimp tacos"

Ingredients:

1 large grapefruit
2 cloves garlic, minced, divided (some for marinade, some for guacamole)
1 lb large shrimp, peeled, deveined and detailed
1/2 cup thinly sliced green onions,divided(some for marinade, some for guacamole)
1 tsp chile powder
1/4 tsp sea salt
1 lime, zested and juiced
1 avacado, peeled and pitted --- CHANGE, we used 2!
8 - 6" corn tortillas, warmed

Directions

1.  Zest grapefruit and set aside in a medium bowl for the Guac.  Segment grapefruit with a paring knife, slice  off the ends and remove pith, working from top of fruit to the bottom.  In a wide shallow bowl, use a knife to make incisions along membranes toward center of fruit and cut segments free.  Cut into bite size pieces.  Reserve juice in bowl(for marinade) and transfer segment pieces to bowl with zest(for Guac.).

2.  To bowl with juice, add 1 clove garlic, shrimp, 1/4c green onions, chile powder and salt.  toss to combine.  Cover and refrigerate for up to 30 minutes.


shrimp and guacamole!


3.  Prepare Guacamole: to bowl with segments and zest, add another clove of garlic, remaining green onions.  Stir in lime zest and juice then smash avaocado into mixture with a fork or the back of a spoon to form a chunky guacamole.  Cover tightly and refrigerate until needed.

4.  Heat a large saute pan on medium-high.  Add shrimp mixture and saute, stirring frequently until shrimp are pink and cooked through, 3-5 minutes.  Spread guac on tortillas, top with shrimp dividing evenly.

2 prepared tacos


Saturday, March 24, 2012

Strawberries + Lemon + a little help = Strawberry Lemonade

So earlier today, I needed some grocery items for dinner, but was too exhausted to go to the store.  So Jon volunteered to go out while I napped.  I needed Chicken and a Lemon....

I should have taken a picture, but he came back with a FULL BAG of lemons! like 10 of them.  I was scared.  But he declared he wanted to try making Strawberry Lemonade.  (He also bought fresh strawberries).

After looking up a few recipes, Jon started juicing some lemons.  I remained doing my own thing, until I was asked to make some simple syrup and help mix it all together.

Here's a picture of the carnage....

The already juiced halfs

It produced just over 2 cups of juice!
I made a simple syrup mixture (2 cups water/2 cups sugar).
Jon also pureed a whole thingy of strawberries...what they come in 1 pound?

We started by adding 1 cup simple syrup to the pureed strawberries.  We added about half the lemon juice to a pitcher, then about half of the strawberry puree.  It was still too sour, so we added about another 3/4c simple syrup.  That was the right tartness, so we just added a bunch of water

Here's the finished product....

SOOOOOOOOOOOOOOOOO TASTY!


"Homemade Strawberry Lemonade"

1 cup of fresh Lemon Juice (about 3-4)
Half a pound of strawberries
~1 1/2 cups of simple syrup
Add water until the 'right' consistency
Ice to make it cold.

Put in pretty pitcher

ENJOY!

Tuesday, January 31, 2012

'Our Own' Roasted Vegetable Pizza

The next adventure in cooking is trying to make a Pizza similar to "Amy's Roasted Vegetable" pizza.

There are really 3 parts to this creation:
1.  Crust
2.  Sauce
3.  Veggie Toppings

CRUST
I've tried using Trader Joe's pre-made crust before, it works great!
This time, since there was so much recent success with sour dough, we decided to half the recipe, and use that as our crust:


INGREDIENTS

  • 3 3/8 ounces bread flour, plus extra for shaping
  • 3 3/8 ounces whole wheat flour
  • 2 teaspoons vital wheat gluten
  • 1/8 teaspoon active-dry yeast
  • 1 teaspoons kosher salt
  • 6-8 ounces filtered water

DIRECTIONS

Whisk together the flour, yeast and salt in a large mixing bowl. Add the water and stir until combined.(dough should be really soupy and not hold shape. ) Cover the bowl with plastic wrap and allow to sit at room temperature for 19 hours.
After 19 hours, turn the dough out onto a lightly floured work surface. Punch down the dough and turn it over onto itself a couple of times.(use plenty of flour as it is sticky) Cover with a tea towel and allow to rest 15 minutes.

After 15 minutes, shape the dough into a ball and roll out into your PIZZA FORM!.
Pre-bake at 450 for 5 minutes, before topping!


SAUCE
This is a carmelized onion sauce.

1 Large Onion
2-5 cloves of garlic
2 T Balsamic Vinegar
Salt and pepper to taste

So Take one onion(we used a Vidalia Onion), slice it up.  Put it in frying pan on low/medium heat with some olive oil.  Stir.  Let sit.  Stir, let sit.  The process to carmelize takes 25(+) minutes!  Really depends on the water content of your onion.  After you've deemed them carmelized, transfer to a food processor.  Puree to be sauce like.  At the same time add Balsamic Vinegar, and salt and pepper.  Once pureed to sauce form, you're done!


Veggie Toppings

We used:
1 Zucchini
1 red pepper
1 orange pepper
8oz Shitake mushrooms

Wash, slice/dice to sizes you like.  Put under broiler until you get nice brown crispy roasted edges.


Assembly
Put all 3 layers together.  We sprinkle LIGHTLY with cheese.  Although not needed and also not in Amy's version.


Tuesday, January 17, 2012

Quilt #3 - for a Big Sister!

After I finished my second quilt, I had a book of lots of ideas of patterns, but I had no idea who my next recipient would be.  Finally Jon had a good idea, I could make one for the big sister of the recipient of Quilt #2.  We wouldn't want her to be jealous that he got a quilt and she didn't.

So, with no pattern in mind, Jon and I went to JoAnn Fabric to look for fun "Big Sister" fabric.  Little did I know what fabric shopping would be like with Jon.  We picked out 2 fabrics.  One with cupcakes and one with monkeys.  (Penguins were scary to me.  Jon thought it was scary to have cupcakes near lady bugs...BUGS ON FOOD IS SCARY!)


I had no idea what to do with this pink cupcake material with green monkeys.  Finally I figured it out, I needed a third color.  Then I made a pattern similar to a quilt we(my friend Kat, Andie and I) made for our friend Bea's wedding.  The difference being that her quilt was on point.(turned 45 degrees)


The first layout on the floor!
Bordered and Quilted


Quilt Specs:
Size: 42"x66"
Started: December 7/8, 2011
Finished the top: December 11, 2011
Quilted: December 11, 2011 
Finished: December 13, 2012
Gifted: January 7, 2012
To: Makayla Ankeny
Made by: Jill Ryan, Rita Ryan and material picked out by Jon.
Quality Control: Jon


Saturday, January 14, 2012

Variation on Sourdough bread

Half-way through the whole wheat loaf!
So the first batch of Sourdough was such a success, we decided to increase the level of difficulty by using whole wheat flour!  We did a half/half ratio of bread flour and whole wheat flour.  In order to compensate, we also added 4 teaspoons of "Vital Wheat Gluten" in order to help it raise.   I thought the last bread was too salty, so we used less salt this time.  While mixing it, we found it was a bit dry, so we also added more water. 


This bread was a smashing success!
Here's a picture of it half gone:


Below is the Modified recipe!  (Check out the original here)


Knead Not Sourdough--with whole wheat flour

---THIS RECIPE if served in 12 equal parts = 4 POINTS PLUS PER SERVING!
ORIGINAL Recipe courtesy Alton Brown, 2008
Prep Time: 10 min
Inactive Prep Time:  20 h
Cook Time:  45 min
Serves: 12 servings
 (but what is a serving anyway?)

INGREDIENTS

  • 9 ounces bread flour, plus extra for shaping
  • 8 1/2 ounces whole wheat flour
  • 4 teaspoons vital wheat gluten
  • 1/4 teaspoon active-dry yeast
  • 2 teaspoons kosher salt
  • 12-15 ounces filtered water
  • 2 tablespoons cornmeal

DIRECTIONS

Whisk together the flour, yeast and salt in a large mixing bowl. Add the water and stir until combined.(dough should be really soupy and not hold shape.  We started with 12 ounces of water, and added 1/3cup more.  The dough should not be firm, but not by runny either) Cover the bowl with plastic wrap and allow to sit at room temperature for 19 hours.

After 19 hours, turn the dough out onto a lightly floured work surface. Punch down the dough and turn it over onto itself a couple of times.(use plenty of flour as it is sticky) Cover with a tea towel and allow to rest 15 minutes. After 15 minutes, shape the dough into a ball. Coat hands with flour, if needed, to prevent sticking. Sprinkle the tea towel with half of the cornmeal and lay the dough on top of it, with the seam side down. Sprinkle the top of the dough with the other half of the cornmeal and cover with the towel. Allow to rise for another 2 to 3 hours, or until the dough has doubled in size.

Oven baking: While the dough is rising the second time, preheat the oven to 450 degrees F. Place a 4 to 5-quart Dutch oven in the oven while it preheats. Once the dough is ready, carefully transfer it to the pre-heated Dutch oven. Cover and bake for 30 minutes. Remove the lid and bake until the bread reaches an internal temperature of 210 to 212 degrees F, another 15 minutes. Transfer the bread to a cooling rack and allow to cool at least 15 minutes before serving.
----------------------------------------------------------
Outdoor coals: Heat charcoal in a chimney starter until ash covers all of the coals. Place 20 to 24 coals on a Dutch oven table. Place a cooling rack (or other wire rack that is at least 2-inches high) directly over the coals. Set a 5-quart Dutch oven on top of this rack and allow to preheat during the last 30 minutes of the second rise. Carefully transfer the dough to the Dutch oven and cover with the lid. Place 20 coals on top. Bake until the bread reaches an internal temperature of 210 to 212 degrees F, about 45 minutes. Transfer the bread to a cooling rack and allow to cool at least 15 minutes before serving.

Pin It

Friday, January 13, 2012

Quilt #2 -- First quilt for a baby boy!


So, after finishing one quilt, I wanted to see if I could do another.  I had the perfect recipient in mind.  His arrival date was off in the future yet.   I kept the pattern the same as the first.  Just new colors(blue and green instead of pink and pink).  The blue actually had planes, trains, and automobiles on it.  And I became OCD and made them always run the same direction on the whole quilt.  So that was the added challenge on this one.  


One of the initial layouts.  Just squares and a possible border


On the quilting frame!


On the Quality Control Tester

Finished...all 4 sides...

The finished product with awesome flannel back.


Quilt  Specs:
Size: 42"x54"
Started: Sunday, November 6, 2011
Quilted: November 26, 2011 
Finished: December 7, 2011
Gifted: January 7, 2012
To: Michael Jeffery Ankeny
Made by: Jill Ryan...(With help quilting it from Rita Ryan)
Quality Control tested: Jon


Thursday, January 12, 2012

Doh! It's Sourdough Bread.

NEXT on the "To Try" list became Sour Dough Bread!  We found a 'simple' recipe..."simple" being it didn't involve a sour dough starter.  But it did take a full day before we got to try it.

The recipe followed is listed below.  Again, Alton Brown to the rescue to explain why we did what we did.

The sour dough was supremely edible.  Ummm yes, I want more.  NOW. 

Here are some pictures of our process:
Jon started the dough Tuesday night, this is after ~8 hours.
Wednesday morning....


After ~20 hours.   After I turned it before forming a loaf.

Loaf formed.  Now letting it rise on tea towel for a few hours.

After I formed the loaf, I went out to dinner with the girls.  I came home to this:

The finished product!!!! 
With the first slice devoured.  That's the inside.  NOM NOM NOM.


Knead Not Sourdough

http://www.foodnetwork.com/recipes/knead-not-sourdough-recipe/index.html

Recipe courtesy Alton Brown, 2008
Prep Time: 10 min
Inactive Prep Time:  20 h
Cook Time:  45 min
Serves: 10 - 12 servings
 (but what is a serving anyway?)

Ingredients

  • 17 1/2 ounces bread flour, plus extra for shaping
  • 1/4 teaspoon active-dry yeast
  • 2 1/2 teaspoons kosher salt
  • 12 ounces filtered water
  • 2 tablespoons cornmeal

Directions

Whisk together the flour, yeast and salt in a large mixing bowl. Add the water and stir until combined. Cover the bowl with plastic wrap and allow to sit at room temperature for 19 hours.

After 19 hours, turn the dough out onto a lightly floured work surface. Punch down the dough and turn it over onto itself a couple of times. Cover with a tea towel and allow to rest 15 minutes. After 15 minutes, shape the dough into a ball. Coat hands with flour, if needed, to prevent sticking. Sprinkle the tea towel with half of the cornmeal and lay the dough on top of it, with the seam side down. Sprinkle the top of the dough with the other half of the cornmeal and cover with the towel. Allow to rise for another 2 to 3 hours, or until the dough has doubled in size.

Oven baking: While the dough is rising the second time, preheat the oven to 450 degrees F. Place a 4 to 5-quart Dutch oven in the oven while it preheats. Once the dough is ready, carefully transfer it to the pre-heated Dutch oven. Cover and bake for 30 minutes. Remove the lid and bake until the bread reaches an internal temperature of 210 to 212 degrees F, another 15 minutes. Transfer the bread to a cooling rack and allow to cool at least 15 minutes before serving.

Outdoor coals: Heat charcoal in a chimney starter until ash covers all of the coals. Place 20 to 24 coals on a Dutch oven table. Place a cooling rack (or other wire rack that is at least 2-inches high) directly over the coals. Set a 5-quart Dutch oven on top of this rack and allow to preheat during the last 30 minutes of the second rise. Carefully transfer the dough to the Dutch oven and cover with the lid. Place 20 coals on top. Bake until the bread reaches an internal temperature of 210 to 212 degrees F, about 45 minutes. Transfer the bread to a cooling rack and allow to cool at least 15 minutes before serving.

Monday, January 9, 2012

Kiss My Bundt - Oatmeal Spice Cake

The "Free" book
I've got a new Bundt Cake Recipe Book.  I got it as a result of spending $30 at the Nordic Ware store.  Now I only have a 6 cup Bundt Pan (for now), so I looked for a recipe that would be easy to 'half' as most of them are for the 10-12 cup pans.


Oatmeal Spice Cake
from the Bundt Classics book by Nordic Ware(see picture)
This dense cake is filled with the goodness of oatmeal and wonderful warm spices


1 1/2 cups boiling water
1 cup rolled oats
1/2 cup sugar
1 cup firmly packed brown sugar
1/2 cup butter, softened
2 eggs
1 teaspoon vanilla
1 1/3 cups all purpose flour
1 teaspoon baking powder
1 teaspoon baking soda
1/2 teaspoon salt
1 teaspoon cinnamon
1/2 teaspoon nutmeg
1/4 teaspoon ground cloves

Heat oven to 325 F degrees.  Grease and flour a 10 or 12 cup Bundt Pan.

Pour Boiling water over oats; let stand until water is absorbed.  In a large mixing bowl, mix sugar, brown sugar, butter, eggs and vanilla until very light and fluffy; mix well.  Add oat mixture; mix well.  Add all remaining ingredients; mix well.  Spoon into prepared pan.

Bake at 325 F for 40-50 minutes or until toothpick inserted in center of cake comes out clean.  Cool 10 minutes.  remove from pan;  cool complete on rack.  If desired, drizzle with Spice or Vanilla Glaze.

I used Vanilla Glaze:

Vanilla Glaze
2 cups sifted Powered Sugar
1 tablespoon butter, softened
1 teaspoon vanilla, almond or rum extract
2-3 tablespoons milk

In Medium bowl, mix sugar and butter.  Add vanilla.  Gradually add milk until desired consistency; mix until smooth.  For thinner consistency, add additional milk.

Here's the cake!
The finished product, glazed


Wednesday, January 4, 2012

Quilt #4 -- A birthday gift!

OK, some of you are wondering what happened to the blog about Quilt #2 & 3.  They happen to be gifts that have yet to be gifted.  So, you just have to wait for them!  I'm excited to post them too, but I don't want the recipients to see.

Quilt #4 was a gift for Janey Czeck's 69th Birthday!  Her favorite color is PURPLE!  She is also a huge lover of music.  Thus this quilt was made with 2 purple pieces and the white squares on the diagonal are made up of music notes.  I would have used white puppy dog fabric if I could have found it.

Size: 42"x78"
Started: Tuesday, December 27, 2011
Finished the top: December 31, 2011
Quilted: December 31, 2011 
Finished: January 1, 2012
Gifted: January 2, 2012
To: Janey Czeck
Made by: Jill Ryan, Rita Ryan and advice from Mike Ryan.

Inside complete, just needs border

I have no pictures while quilting this one, oddly enough.

The next pictures are the complete pictures, with the QA tester:

Here you can see the back!

Here you can see the full length of the quilt


Upon giving this to Janey, she was thrilled.  It was so much fun to see excitement over what I made.  She used it the rest of the night as we watched the Timberwolves beat the Spurs!

Still to come: A picture of the pattern, in case you want to make it too!  This is very easy, I can type up instructions if anyone is interested!

Tuesday, January 3, 2012

Baking Bagels -- as YOU like them


This story starts out before New Year's Eve.  Invited to a party, we were looking for the perfect appetizer to bring.  I didn't want to bring any left overs home(namely if we made sweets).  Jon wanted to make something savory. We remembered the random purchase of Auntie Annie's Soft Pretzels.  We made them, and they were to die for!  NO LEFT OVERS!

Now comes a very quiet and relaxing New Year's Day and we were looking for what made Pretzel's brown and what made them differ from Bagels.  So after watching a bit of Alton Brown's Pretzel(in which he discussed bagels) episode online...We decided to try them ourselves.
The recipe used comes from "The Joy of Cooking".  We made it as it states.  Used only 3 cups of bread flour, as my house is super dry! BUT the BEST part of homemade bagels, is you get to pick your own topping, so if you want Garlic/Rosemary...but Bruegger's only has Garlic or Rosemary/Asiago, you can make what you want!
Rolling the dough out. You can see some already formed ones on the pan


Just before the oven


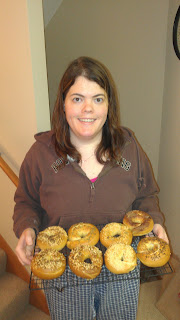
The finished product

 
Me and the finished product


DEFINITELY WILL MAKE AGAIN!!!!  But it does take time (as do all breads....)
Receipe calls for 8 equal parts, next time, we're going to try "bagel thins", so 16 equal parts, same size, just flatter/squished?!

Recipe:
Bagels
from the Joy of Cooking

This recipe makes 8 servings of 7 Points Plus Values each

Combine in a large bowl or the bowl of a heavy-duty mixer and let stand until the yeast dissolves, about 5 minutes:
1 cup plus 2 Tbsp warm (105° to 115° F) water
1 package (2 1/4 tsp) active dry yeast
2 1/2 teaspoons sugar--(we used Honey)
Stir in:
1 Tbsp melted vegetable shortening
1 1/2 tsp sugar--(we used Molasses)
1 3/4 tsp salt
1 cup bread flour
Gradually stir in:
3 to 3 1/2 cups bread flour*
Knead for about 10 minutes by hand or with the dough hook on low to medium speed until the dough is smooth and elastic. Let rest, covered, 15 to 20 minutes.
Punch down the dough and divide into 8 equal pieces. Roll each piece into a rope tapering the ends. Wet the ends to help seal and form into rings, stretching the top end over and around the bottom end and pinching them together underneath. Or alternately, roll each piece of dough into a ball. Stick your thumb through the ball to make a hole. Stretch the hole out about 2 inches. Let rise, covered, on a floured board about 15 minutes, until puffy.
Preheat the oven to 425°F.
Bring to a boil in a large pot:
4 quarts water
1 Tbsp sugar--(we used Molasses)
1/2 tsp salt
Drop the rings 4 at a time into the boiling water. As the bagels surface, turn them over and cook about 45 seconds longer. Skim out and place on an ungreased baking sheet coated with:
Cornmeal
Press the tops of the bagels in a combination of
Caraway seeds, Kosher salt, Sesame seeds, Poppy seeds, Minced granulated garlic, Cracked black pepper
(or whatever you like)
Bake 20 to 25 minutes, turning after 15 minutes, until golden brown and crisp.
Pin It